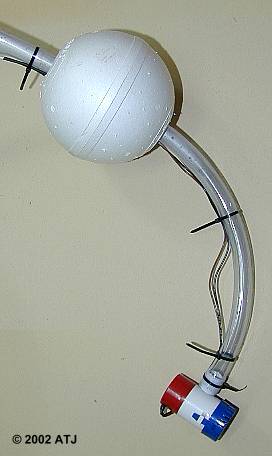
Figure 1: The pump and float assembly. The pump hangs 30-60cm under the float.
Introduction
I have been collecting water using a rope, bucket and funnel, but this has been quite time consuming. I wanted to do something a little more automated so I decided to use a bilge pump and collect from a boat ramp. This article explains how I set up to use the bilge pump for convenience and safety.
Materials
| Quantity | Item | Cost | Store |
| 1 | Rule 1100 GPH 12V Bilge Pump | $74.90 | BIAS Marine |
| 1 | 200mm Polystyrene Float | $8.90 | BIAS Marine |
| 50m | 4mm Figure-8 Marine grade cable | $82.50 | BIAS Marine |
| 1 packet | Black Heatshrink | $5.95 | BIAS Marine |
| 15 m | 25mm ID Clear PVC Tubing | $65.55 | Bunnings |
| 1 | Fused Cigarette Lighter Plug | $2.95 | Jaycar |
| 2 | 7A 3AG Fuses | $0.70 | Jaycar |
| 1 | Inline 10A Switch | $9.95 | Bob Moore Lighting |
I probably have more tubing than I need and probably have more cable than I need, but I went with more as I can always cut it, rather than going with less and possibly not having enough. One of the 7A fuses if for use in the cigarette lighter plug and the other is a spare. The pump is meant to be run off a 6A fuse, but Jaycar only had 5 and 7A fuses.
Assembly
The idea of the float is to keep the pump off the bottom and allow for easy deployment and retrieval. The float has a hole through the centre which was just a little bit too small to fit the tubing so I made the hole slightly larger so that tubing would fit through but would be a tight fit. I also rasped a small groove so that the power cable could come up through the hole.

Figure 1: The pump and float assembly. The pump hangs 30-60cm under the float.
The each wire in the figure-8 cabling was soldered to the leads from the pump. Red was connected to brown and black to black. Heatshrink tubing was placed over each wire and then over the two wires together in order to restrict water getting in. The connection was placed just inside the top of the float. This will keep the join out of water but it may still get wet.
The cabling was cut at around 16m from the pump and the inline switch inserted. This will allow the pump to be turned on an off without having to go inside the car. The other end of the cabling was connected to the cigarette lighter plug. This will allow the pump to be operated from the car.
Cable ties were used to hold the cabling and tubing together.
With all the connections completed, it was time to test.
Testing
I already had an inline cigarette lighter socket with cabling which I connected to the battery for my backup power system. I plugged the new unit in, stuck it into my new 100L bin filled with freshwater and fired it up. Worked like a charm. With a 2m head, I was getting around 1200 L/hr. That was less than I expected, but I think that has to do with the 15m of tubing it had to pump through and the 25m of cabling which will reduce the voltage reaching the pump.. After I have used it a few times for real, I'll probably shorten the tubing and cabling.
Operation
In operation, the pump can be used from a boat ramp or any other place where the car can be within 30m of the water. If I am collecting water with just the car, I reverse the car down the boat ramp to within 20m of the water. I remove the containers from the back (it is a wagon) and place them on the boat ramp at the waters edge. I plug the lead for the pump into the cigarette lighter socket and push the pump and float out into the water as far as I can. I fire up the pump, letting it run for a minute of so to rinse out the system and then start filling up the containers. Figure 2 shows the typical setup.

Figure 2 Using the pump from a boat ramp.
After testing at a boat ramp, I found it better to have a weight tied to the pump via 1-2m of nylon twine. This stops the wind and waves from blowing the float to shore.
Last updated: January 1, 2003