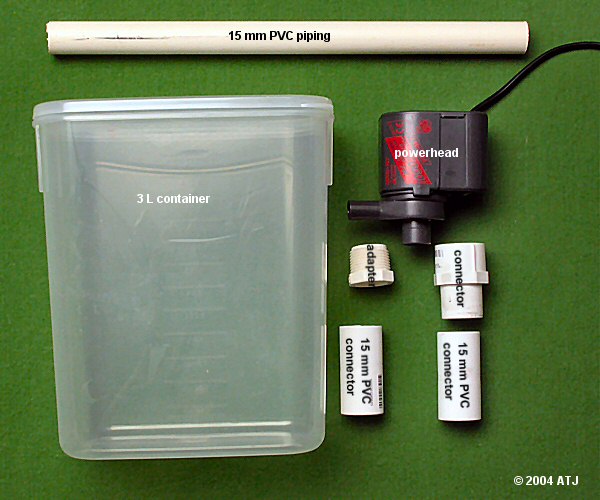
 Figure 1: The parts required for the filter (bioballs not shown).
After deciding to pull my quarantine tank down and set it up again as a bare tank, I had to provide a biological filter for the tank - or more accurately, a device for the nitrifying bacteria to populate. I also wanted a fairly simple design that would be easy for anyone to build.
These are the parts that I used to create my filter. Please use this as a guide and find parts appropriate to the your application.
To determine the appropriate PVC fittings, I took the powerhead with me to a local hardware store and look through all the fittings until I found something that fitted onto the intake of the powerhead. The 15 mm female threaded to 20 mm male threaded PVC adapter fitted well and I then needed a connector so I could connect to straight PVC tubing. This was the 15 mm socket to 20 mm female threaded PVC connector which would take the 15 mm PVC piping. The 2 15mm PVC connectors provide stability to point where the pipe passes through the container.
The size of the container determines how many bioballs can be added to the filter. The more bioballs the greater the surface are for bacteria and the higher the potential bioload. I chose 3 L as this would give me a large enough surface area.
Figure 1: The parts required for the filter (bioballs not shown).
Wash all the parts thoroughly, especially the PVC pieces which have been sitting around at the hardware store collecting dirt.
When completed, the container will be upside-down with the lid being the base.
Cut or drill a hole in the bottom of the container (top of the filter) the same size as the outside diameter of the piping, or just a bit smaller. I used a spade bit slightly smaller than was required to ensure a tight fit. I did not use the bit in a drill but rather turned the bit by hand so as not to risk damaging the container. I first drilled a small pilot hole and then rotated the spade bit in the hole so that the cutting edge of the bit would score a ring the size of the desired hole. A few minutes of scoring results in the removal of the hole. I cleaned up the hole with some sandpaper until the piping would fit through snugly.
Cut a short length of piping so that it can be placed through the bottom of the container (top of the filter) with just enough length to fit into each 15 mm PVC connector on either side of the hole, as shown in Figure 2.
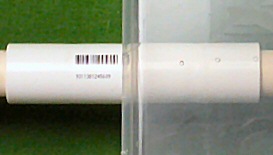 Figure 2: The connectors on either side of the container providing stability.
Cut a length of the PVC piping such that when inserted into the inside connector the other end will be flush with the lid of the container as shown in Figure 3.
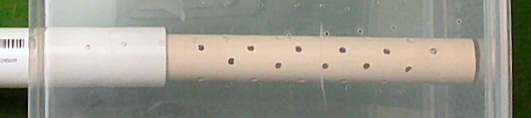 Figure 3: The internal pipe which runs from the connector to the lid of the container.
Drill a number of holes in the internal pipe. I used a 1/8" bit and drilled 44 evenly spaced holes. Keep the holes reasonable small to ensure the water is drawn from all of them. Larger holes will mean more water is drawn from the top of the pipe. The holes can be seen in Figure 3.
Drill a large number of small holes in the container. I used a 1/16" bit. With a lot of very small holes, there will be a more even distribution of flow through the filter providing the bacteria with a good supply of oxygen and nutrients (ammonia and nitrite). Make sure to drill some holes around the base of the container (top of the filter) to allow air to escape. The holes can be seen in Figure 4.
Cut a length of piping to go from the outer connector onto which the powerhead will be attached, using the required connectors and adapters. The length of the pipe is dependent on the depth of the quarantine tank and the connectors and adapters. The impeller of the powerhead must be submerged so don't make it too high. It is probably best to have the top of the powerhead just out of the water so that the flow from the powerhead causes good surface movement as well as drawing water through the media.
Fill the container with bioballs or other suitable media and you're ready to go.
Figure 4 shows the completed filter ready for the addition of bioballs or other suitable media. One thing I noticed while doing some flow testing was that it slightly positively buoyant without the powerhead and only slightly negatively buoyant with the powerhead. This may mean that it will require something to weigh it down.
 Figure 4: The completed filter (without bioballs).
Last updated: October 1, 2004