I tried building a simplified Carlson Surge Device and was frustrated because it would not start siphoning reliably or would continue to suck air and water even though the container was drained. I then read about another design in Eric Borneman's Aquarium Corals. This is a simple design like the Carlson device, but makes use of a flush device and float and even after a small amount of experimenting it proved to be more reliable and more flexible in terms of the size of the piping.
The heart of the device is a Fluidmaster 507 Flush Valve with Bullseye Flapper. This can be ordered from most plumbing suppliers. There are multiple ways the Surge Device can be assembled and the way I built mine is just one example. The pipe size can be varied - the larger the diameter the faster the device will drain. A larger container can be used, which results in more water flow. A faster fill pump can be used and this will decrease the time between surges. The higher the device is above the tank water level, the faster the dump rate will be, however, there will be more head on the pump and the fill rate will be lower.
The following is how I built my surge device. This should be used to get an idea how to build one and can be varied to suit the tank and inhabitants. I recommend reading the section in Borneman (2000) on water movement as this will help with the decision as to how much flow is required.
Parts required:
- 5L Plastic Cereal Container ($7.96 @ Big-W Penrith)
- Fluidmaster 507 Flush Valve with Bullseye Flapper ($16.50 @ Tradelink Castle Hill)
- Plastic Float ($3.50 @ Hardwarehouse Penrith)
- 50 mm PVC Socket Faucet ($6.78 @ Tradelink Castle Hill)
- 50 mm to 40 mm PVC Reducing Bush ($1.99 @ Tradelink Castle Hill)
- 40 mm to 32 mm PVC Reducing Bush ($3.57 @ Tradelink Castle Hill)
- 32 mm to 25 mm PVC Reducing Bush ($3.57 @ Tradelink Castle Hill)
- 1m 25 mm PVC piping ($2.70 @ Hardwarehouse Penrith)
- 3 x 25 mm 90 degree elbows ($2.76 @ Hardwarehouse Penrith)
- 1m 20 mm PVC piping
- 2 x 20 mm 90 degree elbows
- PVC Cement
- Teflon Tape
- Cable Tie
- Maxi-Jet MJ1000 Powerhead
- Eheim 13/16 mm tubing
- Eheim 13 mm 'J' tube
Tools required:
- Drill bit capable of drilling a 60 mm hole in plastic.
- Hacksaw
Construction
Drill a 60 mm hole in the bottom of the cereal container. Remove the flapper and then fit the flush valve through the hole and screw on retaining nut. Mark the top of the stand pipe on the flush valve about 1 cm below the top of the container. The stand pipe will need to be cut to ensure that if the flapper doesn't open, excess water will flow down the stand pipe. Remove the flush valve from the container and cut the stand pipe. Refit the flush valve into the container and screw on retaining nut.
Using the plastic chain that comes with the flush valve and a cable tie around the float, connect the float to the flapper. You will need to experiment with this to get the right length for the string. The flapper can be easily detached and attached from the flush valve for experimentation and adjustment.
Fit all the parts together first and adjust as required. Once satisfactory operation is achieved, the parts can be glued.
Insert the bushes into to the base of the socket faucet. Wrap Teflon tape around thread of flush valve and screw socket faucet on. Insert the piping into the smallest bush. For the flapper to function appropriately you need to have an 'S' bend. That is, the water should flow down through the flush valve, then up and then down into the tank. This creates enough back pressure to allow the flapper to work correctly.
You should do all your experimentation with the surge device in the laundry, garden or other suitable "wet" area. Only when you are happy with the functioning of the device should you use it on a tank with inhabitants.
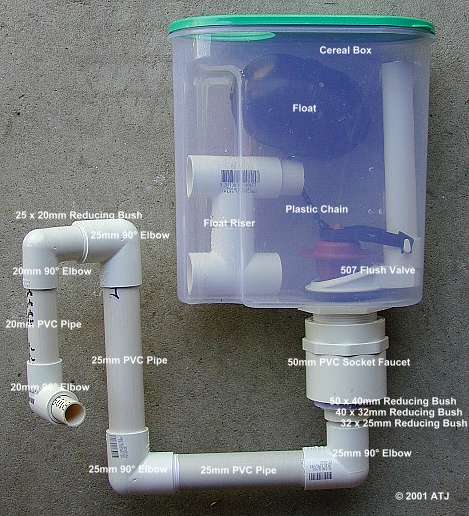
The constructed device. Note the "float riser". This was necessary as the float would sometimes get caught on the flapper. I changed this in the final device to a vertical pipe which keeps the float off the wall of the container. I also removed the end 20 x 15 mm reducing bush and 15 mm pipe, to increase the rate of dumping.
Once you are happy with the function of the device, glue all the PVC piping together. The joins can also be made dry with Teflon tape, but it is advisable that the all joins up to the first two elbows are glued as these are under the most pressure.
The device should be mounted in the hood or on the wall next to the tank such that the bottom of the device is about the water level of the tank. Mine sits on the centre brace of the tank and is filled by a Maxi-Jet MJ1000 powerhead in the tank.
Operation
My device empties in around 21 seconds and fills in 14 seconds. From "empty" to "full" is around 3.8 L. This means it is dumping around 9.5 L on each dump - the 3.8 L in the container plus another 5.7 L from the powerhead as the device empties. The overall flow rate is around 980 L/hr (the rate of the powerhead with a small head and friction) but the dumping is equivalent to more than 1600 L/hr. The exit flow rate is around 260 cm.s-1.
The device is reasonably quiet. Both starting and stooping the dump makes a small amount of noise. There are some bubbles entering the tank during the early parts of the dump, but these are not distracting.
References
Borneman E.H. 2001. Aquarium Corals: Selection, Husbandry, and Natural History. Microcosm Ltd, Charlotte, VT. 464pp.
Last updated: 1 October 2001